Thursday, June 13, 2013

Beginning of June

Our yard is blooming everywhere! Every day we see something we didn't the day before. It is a wonderful feeling to walk around the yard and just let the sights and sounds soak in.

One of our pepper plants.


Serenading from the neighbors downspout.

The first bloom on the second year growth of our Chester Blackberry bush!


The perennials that survived last year are by far the most fun to watch, as they have really taken off:
 
Amethyst in Snow Bachelor Buttons
 
Fire Spinner Ice Plants

 
 Gallery Red Lupine 


One of my new favorite flowers: a Coreopsis Hybrid 'Jethro Tull' - Tickseed
This is a new perennial that was planted in the front yard - hopefully it will take off like the others.

Radishes!

We have our first crop ever!
June 5th we picked our first radishes and have been eating on them since. This is the first thing we have ever planted from seed that grew into something we could eat. I never knew radishes were so juicy.


Sunday, June 2, 2013

1st Wine Kit


We started our first wine-making kit! 

Donnie has been wanting to start a homemade wine kit for quite awhile, but it never seemed to be the right time. First we needed to save up and Christmas helped with that. Then we needed to find a time to go to the wine shop together to pick one out. The shop with the most selection is close to our parents' house so we tried to find a time to combine trips.

Five months later we finally made it! 

Since we had been thinking about this for some time we knew what we wanted: definitely a red and nothing too sweet. Something like a Syrah or Merlot would be perfect.


We looked around, read the boxes, and left with a sweet white wine. Go figure. 

What we bought was a Washington Columbia Valley Riesling. It was 30% off, which you just can't pass up. (Especially if it doesn't turn out quite right since it is our first attempt.) In addition, not all of our family likes red wine, so we thought this might be a better wine to share.

A couple days later we got it started:


Pouring the juice into the primary fermentation bucket. It smelled just like apple juice. Apple juice!?! Isn't this supposed to be grape?

After the bucket was filled the rest of the way with water it needed to be stirred to combine the ingredients and aerate. Donnie has a special drill just for this, which makes stirring 6 gallons at a time no problem.


Checking the hydrometer reading and temperature to make sure it is the best environment the yeast. It was perfect, so in went the yeast. The lid was put on the bucket and it is now sitting either on the counter or the top of the fridge depending on the inside temperature of the house.


In about a week it will be ready to transfer into the 6 gallon glass carboy for the secondary fermentation.

Hmmm....Does this count as a boxed wine?

Soft-Cheese Class & Cheesemaking

For our five year anniversary we attended a class called the "Artisan Cheesemaking & Sampling Class." It was a whole lot of fun and not nearly as complicated as it sounds. Cheese, especially soft cheese, isn't really approved on our diet, but what better indulgence is there? When I heard about the class we couldn't turn it down.

We watched as the instructor flew through the steps of cheesemaking like they do on TV cooking shows: 1. Mix the milk and culture 2. let sit for 12 hours, then she lifted the lid off of the next pot and like magic- Cheese!

We got to sample five soft-ripened cheeses, three Chevre and two Fromage Blanc. We learned that Chevre means goat and Fromage Blanc is Chevre made with cow's milk instead of goat's milk. I had no idea.

The class was hosted in a spice shop and all of the samples included spices from the shop. Oh man, were they good. The best sample was the chocolate chevre truffles! Who knew you could mix sugar and chocolate with cheese to make a wonderful dessert? It isn't something we would normally think of.

The unfortunate part about attending a cheese class in a spice shop is you can't possibly leave the shop without buying all of the spices you just sampled and then heading over to the local brew shop to buy cheese culture and rennet.


Soooo.....here is our attempt at homemade cheesemaking the next day:
 After leaving it to sit, the curds and whey have separated.
In theory anyway. Our cheese didn't quite separate completely because our milk was not farm fresh and it was probably pasteurized to too high a temperature.

 
Letting the whey drip out.

 
Watching it drip was quite mesmerizing. I could believe that six hours later it was still dripping. 
(keep your naughty thoughts to yourself . . . )

 
After the cheese was finished we had a wine and cheese night! The cheese by itself tasted like mild yogurt more than anything, which is probably because we couldn't find the right culture. We mixed four different seasonings, including two new ones from the shop, to see what we liked the best. The truffle salt won hands down. Yum!

Friday, May 31, 2013

Grass Removal - Xeriscape

Our next project was removing the small patch of grass in the front yard that was between the houses. It was such a waste of water and time trying to keep it alive - so it had to go.

Apparently, I never took a picture of this patch of grass at any point since we moved in, so I don't have a before picture. I suppose that everyone knows what grass looks like though.

Almost Done.
We removed it all just using a shovel and muscles!

Donnie supplied both the shovel and the muscles!

 
I rolled the sod.

 
Here is the patch after the grass was removed.

 
Here is the patch after we added some perennials, mulch, and flagstone.
What a difference!

Sunday, May 19, 2013

Cabbage Bandit Struck Again!

We weren't too worried when all of the starter cabbage plants from the second batch disappeared, because we had started cabbage in the first set too and they were doing great. Unfortunately, it appears that home grown cabbage this year is not meant to be.

 
Before - taken 2 weeks ago

After - taken last night


The culprit's response: feigning innocence

She snuck off the patio while I was working in the front yard and again, didn't touch any other plant - only the cabbage!

Spring is Here

This week saw a lot of changes. 

We finally got all of our starters planted, sowed more seeds, and spread a truckload of mulch.

These are all the starters, peppers mostly, that didn't fit in our garden beds. I just can't bear the thought of throwing away the little plants and since I have all of the containers from when we were container gardening at the apartment, I might as well put them to good use. 

Our first radishes have come up! Weeding and thinning to come. . .

 The landscaping on the east side of the house is now complete!


Along the back fence is also done.


The apple trees are in bloom. 
We are pretty sure the April snows killed the blooms off the apricot trees and probably the cherry tree, but the apples don't appear to have been affected.


Our first honeybee of the year!

Thursday, May 16, 2013

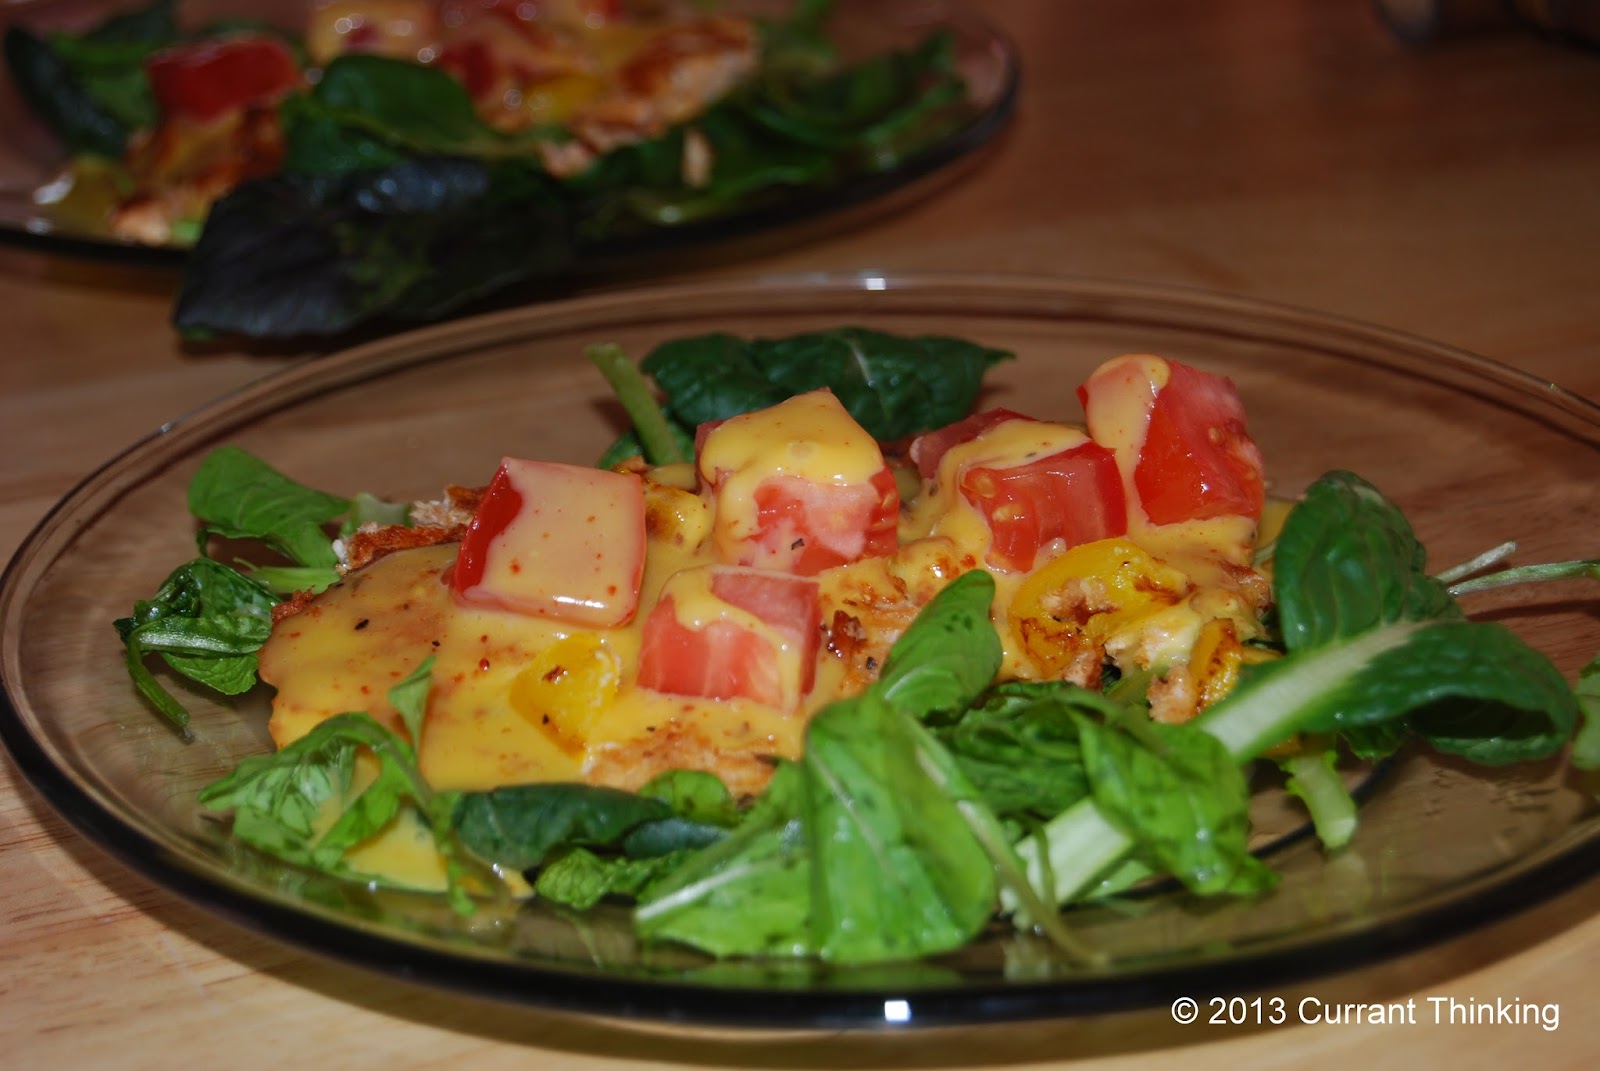
Fresh Caught Crappie with Hollandaise Sauce


Donnie has a co-worker who fishes almost every day. One night he gave us a few Crappie and since the sooner you eat the fish the better, we made this for breakfast the next day. It would be great for any meal.

Ingredients
3 Crappie; de-boned and fillet (or other fish, as desired)
1/2 Tomato
1/2 Yellow Bell Pepper
Arugula & Tatsoi (or any early spring greens)
Coconut Flour
Cayenne Pepper
Salt & Pepper
Butter or Bacon Grease

For Hollandaise Sauce:
Three large egg yolks
1 stick of Butter
1 Tbsp Lemon Juice

Directions:
1. Mix together the coconut flour, cayenne, and salt & pepper to make a breading for the fish.
2. Pat fish dry and roll in flour mixture. Shake off any excess and repeat for the rest of the fish.
3. Heat up a large skillet pan and melt enough butter or bacon grease to coat the bottom of the pan. Once hot, fry the fish until golden brown on both sides.
4. Cube the tomatoes and peppers.
5. Place a layer of greens on each plate, add the fish, and sprinkle with the tomatoes and peppers.
6. Drizzle the hollandaise sauce over the top of everything.

Hollandaise Sauce:
While the pan is heating up for the fish, the sauce can be started.
Mix together the egg yolks and lemon juice in a small saucepan. Add the butter and set over low heat. Stir frequently. When the butter is completely melted and the sauce starts to thicken, it is done.

Note: We left the skin on the fish, but it can be taken off prior to breading. If you leave it on you get a little bit of an extra crunch.

Sunday, May 12, 2013

Cabbage Houdini

Our cabbage plants have disappeared . . .


One guess as to where they went:


This picture was taken the day before, so I am guessing this was when Lucy was scouting out her favorite treats. 

She is definitely a German dog: she didn't touch any of the other plants - just the cabbage.

Backyard Hobby Farm: Spring 2013 Part 2 - Seedlings

Back in February we were antsy to get started planting, so we started by looking up the average last day of frost for Colorado. We read that mid-April to beginning of May is a good bet and we figured that since it has been so warm the last couple of years this seemed reasonable. Having never started any plants inside before, we did some research and bought a rack, lights, heating pad, and seeds. We were ready to go!

We started two rounds of plants inside from seed. Here are some pictures of our starters:


The first round was planted March 3rd and the second March 17th. The seed packets said to start them 4-6 weeks before transplanting outside. The timing was perfect!

Well, not so much. We have had snow three of the last four weeks and rain the fourth week. This is wonderful since we need moisture desperately, but horrible considering that we need to get our plants in the ground. 

Last Sunday, before the rains, we decided that we couldn't wait any longer if we wanted any of our plants to survive. They have been hardening off for about a week and a half, working around the frosty days, so they should be ready to go

We already decided to consider the first round of seedlings as practice for the second round for a few reasons:
1. We knew they were started too early
2. We didn't have the lights set up early enough, lending to leggy plants. 
Therefore, if they all die after transplanting we still have round 2!

Here is our garden now:


We shall see if they survive!

Meanwhile, after all the trouble we have had with the weather and the plants getting too big, I tried to find the website that we used for the last day of frost to see if there was any other information that we may have missed, but . . . I can't seem to find it! Well now what? 

I obviously needed a better source, so I looked up the last day of frost from our extension office and found this instead: May 2nd for 50% confidence, May 12th for 80% confidence, and May 18th for 90%. I guess the old saying to wait until mother's day is pretty accurate after all. Next year we will know better than to start plants indoors the beginning of March. Live and learn. 

We had fun watching the plants pop out of the dirt anyway!

Saturday, May 11, 2013

Fermented Mango Sauerkraut


Makes: 2 liter Jar


Ingredients
2 Heads of Cabbage
5 Carrots
1 Red Onion
2 Mangoes
2 tsp Red Pepper Flakes
~5 tsp Salt (or to taste)

Tips: When preparing the ingredients it is easier to work with half a batch at a time. This recipe can also be halved to fill smaller jars.


Prepare the Vegetables
1. Shred cabbage with knife or mandolin slicer
2. Julienne the carrots into small strips and cut these strips into ~ 1.5" pieces
3. Slice the onion
4. Cube the mangoes
Directions
Combine the vegetables in a large bowl and sprinkle with salt. Mix and crush the vegetables together to bruise the cabbage and release the juices. Mix in the mangoes and red pepper flakes.
Using a funnel, fill the fermenting jar with the mixture. Crush and compact the mixture as much as possible into the bottom of the jar. Make sure that all of the mixture is covered by liquid - this is VERY important.


Repeat all the steps with the second half of the ingredients. 

Once the jar is full, wipe the rim of the jar and the lid with vinegar to sanitize. Close the lid on the jar. Done!

Leave the jar on the counter or put it in a cabinet to ferment. Test the sauerkraut after 3 days, one week, two weeks . . . etc to check for desired consistency and taste. Always make sure the mixture is covered in liquid. Once it is to your liking it put the jar in the refrigerator.


Notes: 
  • We ate the excess that wouldn't fit in the jar like coleslaw. 
  • During the fermenting process, the jar will release pressure through the rubber seal, which also tended to spit a little liquid. Because of this I would suggest putting the jar somewhere that is easy to clean that won't get ruined by the moisture or set it on a towel first.
  • After a week the fermented sauerkraut tasted great. 
  • It makes a delicious side dish as well as a condiment since the vegetables are still on the crunchy side.

Sunday, May 5, 2013

Patio Update


We are Done! (...well almost)

Anticipating the last snowstorm we worked pretty much non-stop from Friday through Tuesday, finishing just in time for the snow. During the weekend though the weather was beautiful, so we couldn't ask for more.

Here are some pictures of the progress: 


Getting the road base compacted and level. 
The stone cutter we borrowed (up front) made cutting and fitting the stone a breeze.
Lucy making sure that the patio is aligned correctly for sun bathing.
We are now ready for sand and then we can finally start laying the brick.


Leveling and laying the brick. 
Getting the colors to flow how we wanted was half the battle.


Finished!


We still need to add the step and finish the corners, but other than that we are done. What a wonderful feeling. It was definitely worth the work! 

(May this last a very, very long time so that we don't have to do it again anytime soon.)